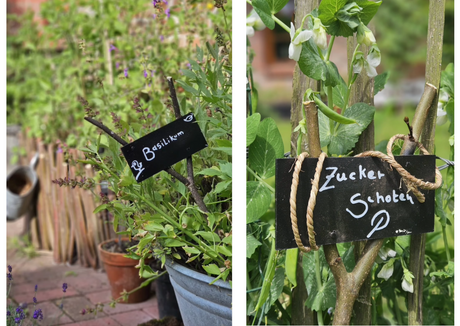

Welcome to your DIY project for a rustic country-style decorative chalkboard! In this tutorial, we'll show you step-by-step how to create a unique decoration using leftover wood and chalkboard paint. Our goal is to create a charming piece that reflects the warm and welcoming character of country style. By using scrap wood and chalkboard paint, we'll create a functional and aesthetically pleasing decorative chalkboard that will add a personal touch to your home. With our easy-to-follow instructions, you can create this rustic country-style decorative chalkboard and bring a cozy atmosphere to your living space. Discover with this DIY project how you can easily create a unique decorative piece that adds natural beauty and warmth to your home.
Materials:
- Old wooden board (e.g., an old cabinet door)
- Sandpaper or sanding machine
- 4 additional wooden boards
- saw
- wood glue
- Paint brush
- Chalkboard paint
- chalk
Step 1: Preparing the wood
- Start by thoroughly sanding the old wooden board with sandpaper or a sanding machine to remove any imperfections and create a smooth surface. Then, the dust must be thoroughly removed.
Step 2: Cutting the frame boards
- For the frame of the decorative board, cut four more wooden boards at a 45-degree angle (miter cut), their length corresponding to the sides of the previously prepared wooden board or the future board surface. Cutting at a 45-degree angle creates a harmonious frame. Ensure that the miter cuts fit well at the corners.
Step 3: Attaching the frame
- Now you can apply wood glue to the edges of the frame boards and place them onto the edge of the prepared wooden board. Press the frame boards firmly together to ensure good adhesion. Allow the glue to dry according to the instructions on the packaging. You can clamp the frame in place with wooden clamps while it dries.
Step 4: Applying the chalkboard paint
- In the next step, you can apply the chalkboard paint to the inside board using a brush. Make sure the paint is applied evenly and thinly. Allow the first coat to dry completely before applying a second coat to achieve a uniform appearance.
Step 5: Let it dry and use
- Allow the chalkboard paint to dry completely, according to the instructions on the paint can. Once the paint is dry, you can write on or decorate your new chalkboard with chalk.
With these steps, you've created a decorative chalkboard with a frame made of reclaimed wood and chalkboard paint. You can use the chalkboard, for example, as a memo board, for notes, or as a decorative element for your home!
Click here for the video tutorial: