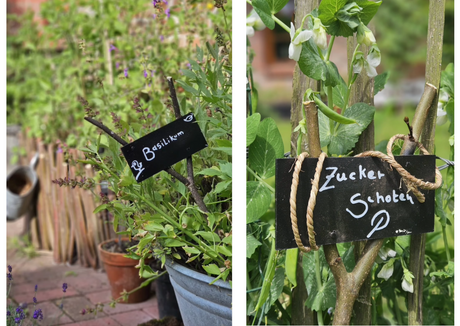

A home herb garden is not only practical, but can also be a real eye-catcher. To stylishly label your herbs, we'll show you today how to easily make your own personalized herb markers from branches and a bit of wood. This project is not only functional, but also a beautiful decorative accent for your garden or kitchen.
Materials needed:
- branch forks
- Old wood (for example, the back panel of old furniture)
- saw
- Paint and brush
- Waterproof pen for writing
- screws
- screwdriver or cordless screwdriver
Step 1: Cut the branch forks to size
- Start by collecting some forked branches and cutting them to the desired length. The length should be chosen so that the straight end can be firmly inserted into the soil of your herb pots or beds.
Step 2: Saw the wood to size
- Take some old wood, such as the back panel of an old piece of furniture, and saw it into small signs. These should be at least as wide as the branch fork so that they can be easily attached later.
Step 3: Paint and label the wooden boards
- Paint the sawn wooden boards in a color of your choice. Choose a color that will look good in the garden and make the lettering stand out. Once the paint is dry, label the signs with the names of your herbs. Use a waterproof marker so the writing will withstand rain.
Step 4: Attach signs to the branch fork
- Once the signs are dry and labeled, screw them onto the branch fork. Position the signs so they are easy to read when stuck in the ground.
Step 5: Completion
- Your homemade herb markers are now ready to be used in your garden or herb pots. Simply place them next to the corresponding herbs and enjoy the practical and stylish labeling.
With these simple steps, you've not only organized your herb garden practically, but also created a charming decoration. Happy gardening and decorating!
Click here for the video tutorial:
View this post on Instagram